Calculating Distance using ESP32
[ ]
]
Introduction
This tutorial introduces students on how to use ultrasonic distance sensors with an ESP32 and using those readings to light an LED to signify when an object is out of reach. From this tutorial students will learn to calibrate sensors and get accurate real-world measurements to drive an output device.
The motivation behind this tutorial is to introduce students to various different input and output sustems that can be applied to other real world applications.
Learning Objectives
- Bread boarding
- Using an ultrasonic sensor
- Sensor input calibration
- Live output reading
Background Information
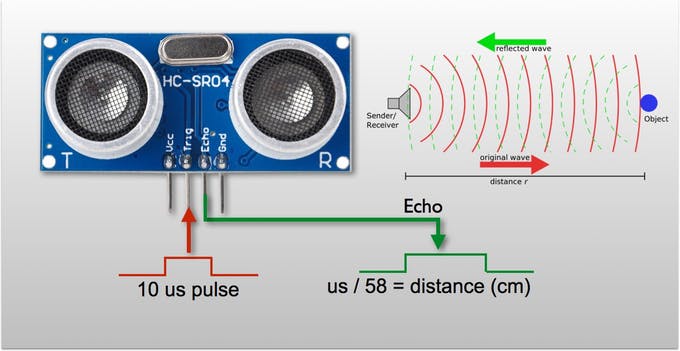
A proximity sensor is used to measure the distance between the sensor and an obstacle by sending pulsing high frequency noises and calculating the time between the pulse and the echo. We are using an HC-SR04 due to its afforable and ease of set up. Other distance sensors exist but they are much more expensive or are much harder to setup. The drawback of these ultra sonic sensors are their difficulty gathering accurate data when used against sound absorbing material.
Getting Started
Required Downloads and Installations
The student is expected to install the Arduino IDE software along with the board drivers for the ESP32 family boards. The Arduino IDE software can be installed by looking up Arduino IDE and going to the first link on Google. From there, students should choose which version that would work with their computer.
Required Components
List your required hardware components and the quantities here.
| Component Name | Quanitity | | ESP32 dev board | 1 | | HC-SR04 Sensor | 1 | | LED | 1 | | Bread Board | 1 | | Jumper Cables | 1 | | USB typeC cable | 1 |
Required Tools and Equipment
- Computer with USB port
- Arduino IDE
- Internet Access
Part 01: Name
Introduction
We are learning how to use an ESP32 to get a distance reading and using that reading to display some sort of output.
Objective
- How to use Arduino IDE with ESP32
- How to use an Ultrasonic sensor and how they work
Background Information
Students must be somewhat familiar with Arduino coding syntax and breadboarding.
Components
- List the components needed in this challenge
Instructional
Step 1: Setting up project space Download all required software for this project
- Assemble ESP32 board if not already assembled
- Download Arduino IDE through this link (insert link later)
- Collect all needed materials (listed in required components section above)
Step 2: Connect HC-SR04 to ESP32 Connect the following pins on the ultrasonic sensor to the pins on the ESP32
- VCC -> 5V
- GND -> GND
- Trig -> GPIO of your choosing
- Echo -> GPIO of your choosing
Step 3: Setting up in Arduino IDE
Input code to have initial setup of ultrasonic sensors
Example
Introduction
The board should react to different readings from the ultrasonic sensor. In our code we have it set up so that the readings are in centimeters and it will light the LED once the reading is over 200cm. The distance is also shown in the serial monitor so that the use can get an understanding of what the sensor is reading.
Example
Analysis
The bread boarding is very simple. In the code we can see the set up of each each pin. When finding the distance we first define duration as the time it takes for the echo pin to receive the intial sound back from the ultrasonic sensor. Distance is calculated using the time it takes to receive the readings multiplied by the speed of sound in cm/s. Then it is divided by two as it is the two way distance when reading the time.
Additional Resources
Useful links
https://randomnerdtutorials.com/esp32-hc-sr04-ultrasonic-arduino/