ESP32 BLE Communication with Notifications
Introduction
This tutorial shows you how you can set up Bluetooth Low Energy (BLE) communication using the ESP32-S3 Mini and the Arduino IDE. We’ll make the ESP32 advertise itself as a BLE server and send out "Hello World!" notifications every second. You’ll be able to connect to it with your smartphone using an app like LightBlue or nRF Connect and see live data streaming. This can be used for IOT projects later on, it is especially useful for sending sensor readings, triggering actions, or setting up wireless communication in any embedded project.
Learning Objectives
- Use Arduino to program BLE functionality on ESP32
- Create a BLE service and characteristic
- Send notifications from ESP32 to a mobile device
- Connect and test BLE output using a smartphone
Background Information
BLE stands for Bluetooth Low Energy. Unlike Wi-Fi, it is not meant to transfer large amounts of data. Instead, it’s ideal for short-range, low-power communication — perfect for IoT projects. Compared to normal Bluetooth, the energy usage is much smaller.
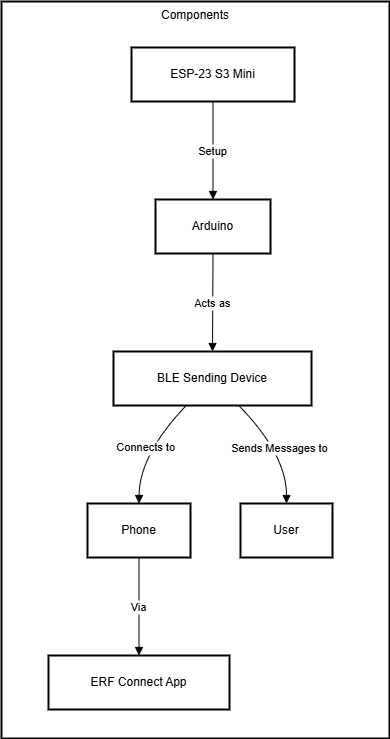
The ESP32 will act as a BLE server and your phone as a client. The server advertises a service (a category of features), and within that service is a characteristic (a piece of data you can read or subscribe to).
Each service and characteristic has a unique UUID so the client can understand what it’s talking to.
Overview of our System
Getting Started
Make sure you have the correct software and libraries set up before we go on.
Required Downloads and Installations
- Arduino IDE
- ESP32 board manager URL for Arduino Preferences:
https://raw.githubusercontent.com/espressif/arduino-esp32/gh-pages/package_esp32_index.json - BLE scanner app for your smartphone:
Required Components
| Component | Quantity |
|---|---|
| ESP32-S3 Mini | 1 |
| USB-C cable | 1 |
| BLE-capable smartphone | 1 |
Required Tools and Equipment
- Arduino IDE on your computer
- BLE app installed on your smartphone (refer to my recommendations earlier dependiung on if you use Apple/Android)
Part 1: Writing the Code
Introduction
This section walks you through writing the BLE server code that sends out notifications. The code is broken down into logical sections to help you understand each component better.
Objective
- Make the ESP32 show up as a BLE device
- Create a service and characteristic
- Notify connected clients every second
Background Information
We’ll use the BLEDevice, BLEServer, and BLECharacteristic classes from the ESP32 BLE library. We’ll define custom UUIDs, which are just unique IDs that help clients know what they’re reading exactly.
Instructions
Follow the code sections below, copying each block into your Arduino IDE in order:
Step 1: Include Required Libraries
#include <BLEDevice.h>
#include <BLEServer.h>
#include <BLEUtils.h>
#include <BLE2902.h>
These libraries provide all the BLE functionality we need. BLEDevice handles the overall BLE device setup, BLEServer creates the server that clients connect to, BLEUtils provides utility functions, and BLE2902 handles the descriptor for notifications (this is a standard BLE descriptor that tells clients they can subscribe to notifications). Combining them all enables us to make our BLE program work!
Step 2: Declare Global Variables
// Declare a pointer for the characteristic
BLECharacteristic *pCharacteristic;
We declare a global pointer to our BLE characteristic so we can access it from both the setup() and loop() functions. This characteristic will hold the data we want to send to connected devices (e.g. your Smartphone)
Step 3: Initialize Serial Communication and BLE Device
void setup() {
  Serial.begin(115200);  // Start serial monitor for debug messages

  // Initialize BLE and set the device name
  BLEDevice::init("ESP32_S3_Mini");
The Serial.begin() starts serial communication at 115200 baud rate for debugging. BLEDevice::init() initializes the BLE stack on the ESP32 and sets the device name that will appear (e.g. in nRF conenct) when other devices scan for BLE devices nearby.
Step 4: Create BLE Server
  // Create a BLE server
  BLEServer *pServer = BLEDevice::createServer();
This creates a BLE server object. The server is what clients (like your phone) will connect to. Think of it as opening a “shop” that clients can visit to access your services and data.
Step 5: Define BLE Service
  // Define a custom service with a 128-bit UUID
  BLEService *pService = pServer->createService("4fafc201-1fb5-459e-8fcc-c5c9c331914b");
A BLE service is like a category of related functions. We create a service with a custom UUID (Universally Unique Identifier). This specific UUID is randomly generated and uniquely identifies our service. Clients will look for this UUID to find our specific service among potentially many BLE devices.
Step 6: Create BLE Characteristic
  // Create a characteristic within that service
  pCharacteristic = pService->createCharacteristic(
    "beb5483e-36e1-4688-b7f5-ea07361b26a8",
    BLECharacteristic::PROPERTY_READ | BLECharacteristic::PROPERTY_NOTIFY
  );
A characteristic is the actual data container within a service. It’s like a specific piece of information or function within that service category. We give it its own UUID and set properties: PROPERTY_READ allows clients to read the current value, and PROPERTY_NOTIFY allows the ESP32 to send updates to subscribed clients automatically.
Step 7: Configure Characteristic for Notifications
  // Set initial value and enable notifications
  pCharacteristic->setValue("ESP32 BLE Ready!");
  pCharacteristic->addDescriptor(new BLE2902());
We set an initial value for our characteristic and add a BLE2902 descriptor. This descriptor is a standard BLE component that tells clients they can subscribe to notifications from this characteristic. Without this descriptor, notification functionality won’t work properly.
Step 8: Start Service and Advertising
  // Start the BLE service
  pService->start();

  // Begin advertising so clients can find the ESP32
  BLEAdvertising *pAdvertising = BLEDevice::getAdvertising();
  pAdvertising->start();

  Serial.println("BLE advertising started...");
}
pService->start() activates our BLE service, making it available to clients. The advertising mechanism broadcasts the ESP32’s presence so that BLE scanner apps can discover it. Once advertising starts, your device will appear in BLE scanner apps on nearby phones. The serial print confirms everything is working.
Step 9: Main Loop - Send Notifications
void loop() {
  delay(1000);  // Wait for 1 second

  // Create a new message
  String msg = "Hello World!";

  // Update the value of the characteristic
  pCharacteristic->setValue(msg.c_str());

  // Notify connected clients
  pCharacteristic->notify();
}
The main loop runs continuously. Every second (1000ms delay), we create a “Hello World!” message, update our characteristic’s value with this message, and then notify any connected clients. The notify() function sends the new value to all subscribed clients automatically. The .c_str() converts the Arduino String object to a C-style string that the BLE library expects.
Part 2: Connecting from Your Phone
Introduction
Now let’s test the BLE communication using a smartphone app.
Objective
- Connect to the ESP32 using a BLE app
- Subscribe to notifications from the characteristic
- View messages updating every second
Background Information
BLE apps like LightBlue and nRF Connect allow you to view nearby BLE devices, explore their services, and enable notifications to receive live data.
Instructions
- Upload the complete code to your ESP32
- Open your BLE scanner app
- Scan for devices — look for
ESP32_S3_Mini - Connect to the device
- Find the service UUID:
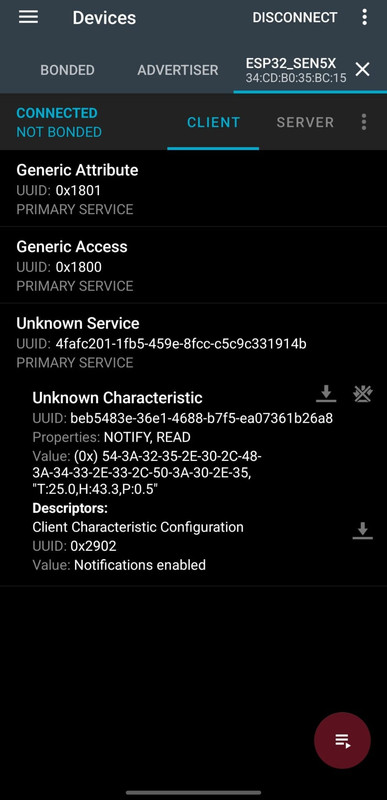
4fafc201-1fb5-459e-8fcc-c5c9c331914b - Inside that service, find the characteristic UUID:
beb5483e-36e1-4688-b7f5-ea07361b26a8 - Tap “Enable Notifications” or similar
- You should start seeing
"Hello World!"every second
Here is an example picture of the App interface for our Project. We had the ESP-32 connected to a Sensor which measured Temperature, humidity and particulate matter and send these data via BLE. In your case, the message would be “Hello World!” instead of the sensor output (T:23,H:43.3,P:0.5)